This is an essential part of offering your services to potential clients and is so easy to set up using iredmail. A free, fully fledged, full-featured mail server solution. All used packages are free and open source, provided by the distribution vendors you trust.
- Postfix: SMTP service
- Dovecot: POP3/POP3S, IMAP/IMAPS, Managesieve service
- Apache: Web server
- MySQL/PostgreSQL: Storing application data and/or mail accounts
- OpenLDAP: Storing mail accounts
- Policyd: Postfix policy server
- Amavisd: An interface between Postfix and SpamAssassin, ClamAV. Used for spam and virus scanning.
- Roundcube: Webmail
- Awstats: Apache and Postfix log analyzer
- Fail2ban: scans log files (e.g. /var/log/maillog) and bans IPs that show the malicious signs -- too many password failures, seeking for exploits, etc.
Don't be intimidated by this list it is almost a one-click install.
Follow the excellent installation instruction for your operaing system from here http://www.iredmail.org/doc.html#installation_guide
The main gotcha is your FQDN (fully qualified domain name). DO NOT use the same name as you have given your host in the Bhost control panel.
The installation is very straightforward. All the information you enter will be sent to your first mailbox account so you need not worry about different passwords etc.
On completion the screen displays all the newly created accounts and passwords necessary for your mail server. Don't panic these are also posted to your first mailbox and can be saved from there.
Now reboot your VPS then log in to your mail server through the webmail interface. https://www.mynewmailserver.com/mail postmaster@mynewfqdn.com with the password you created. You will have two emails in your account. Save the one with all the passwords to a text file on a USB or print it out and keep it safe somewhere..
Haha not quite setup yet. Try sending an email from your newly created postmaster account and it will go straight into the recipients Junk Box.
First set up a reverse DNS(link to reverse dns here) record using Bhost Contol panel. Dont worry if you are hosting a lot of different clients email servers. As long as their is one PTR record mail servers recognise that many sites share the same IP address.
Now set up SPF. This is a TXT record in your DNS server settings. For each domain you are delivering mail from these settings need to be correct.
mynewmaildomain.com. 3600 IN TXT "v=spf1 ip4:202.96.134.133 -all"
Where the IP address is obviously your own.
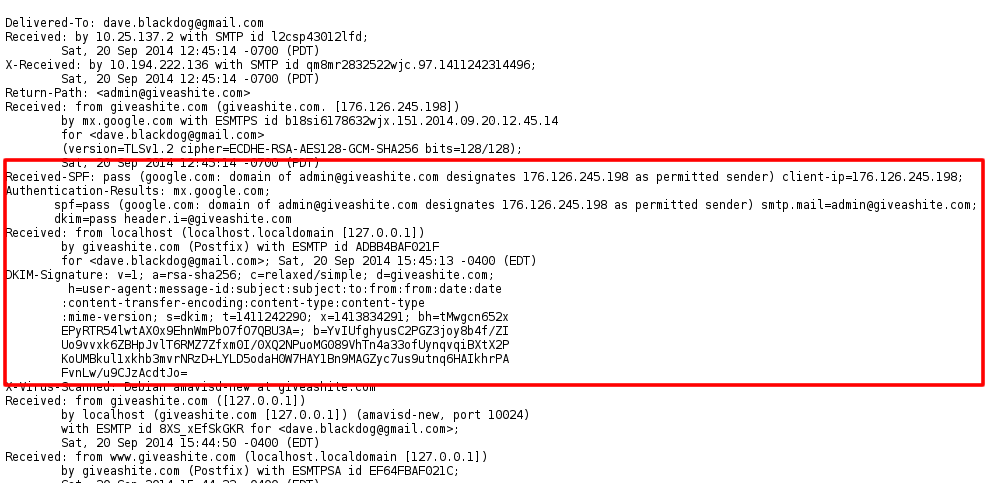
This will still result in mails getting put in the junk box. This is a typical mail header

You can see we have an SPF pass but the mail still gets dumped in Junk. We now need DKIM.
DKIM
So you can imagine from its name this is set up on a domain by domain basis. So if you are hosting multiple mail servers these DKIM records must be set up in each DNS record for the domain being served. One record will have already been created for your first/initial mail server. To see this use
amavisd showkeys
or
amavisd-new showkeys
- Copy output of above command into one line, like below. It will be the value of DNS record.
v=DKIM1; p=MIGfMA0GCSqGSIb3DQEBAQUAA4GNADCBiQKBgQDYArsr2BKbdhv9efugByf7LhaKtxFUt0ec5+1dWmcDv0WH0qZLFK711sibNN5LutvnaiuH+w3Kr8Ylbw8gq2j0UBokFcMycUvOBd7nsYn/TUrOua3Nns+qKSJBy88IWSh2zHaGbjRYujyWSTjlPELJ0H+5EV711qseo/omquskkwIDAQAB
- Add a 'TXT' type DNS record, set value to the line you copied above.
- After you added this in DNS, type below command to verify it:
# amavisd-new testkeys
TESTING: dkim._domainkey.iredmail.org      => pass
If it shows 'pass', it works. Now send a mail to another address and check the mail header to see that your new mail server passes both the SPF and DKIM checks
Howto
Create a dkim-key for you domain
newdomain.com
.
amavisd-new genrsa newdomain.com.pem
//Edit amavis settings file
# nano /etc/amavis/conf.d/50-user //Append your domain to this line @local_domains_maps = ['mx.xxx.com', 'olddomain.com', 'newdomain.com']
//And add it to the dkim_key (it's a bit further down in the file) dkim_key("newdomain.com", "dkim", "/var/lib/dkim/newdomain.com.pem");
Problem : Checking the headers I see that SPF and DKIM pass correctly. I have no problem with GMAIL, YAHOO, and other, but hotmail seems very strict.
Solution :This is correct. Hotmail / outlook.com are insanely strict for .. really no sensible reason at all. You have checked the obvious things:
- SPF
- DKIM
- reverse DNS
- My IP is not listed in any backlist, I used: mxtoolbox.com
The only thing left to do is manually file a request with Microsoft to get your URL listed in their safe senders. I really wish I was kidding, but even after triple checking all our mail settings (same as your above bulleted list), testing successfully on every other mail provider under the sun, etcetera, we had to file a manual Hotmail inclusion request before email from our server would arrive to Hotmail / outlook.com users.
As you can see on Microsoft's Postmaster Troubleshooting page:
IPs not previously used to send email typically don’t have any reputation built up in our systems. As a result, emails from new IPs are more likely to experience deliverability issues. Once the IP has built a reputation for not sending spam, Outlook will typically allow for a better email delivery experience.
The Improving E-mail Deliverability into Windows Live Hotmail (pdf) document describes this troubleshooting for the "Your e-mail is being delivered to the Junk e-mail Folder" scenario:
- Too many recipients reported your previous e-mails as spam
- Too much of your mail is sent to invalid or inactive e-mail addresses
- Your SenderID record is incorrect or missing
None of which applies here to a new mailer anyway, and SenderID / SPF was already checked as valid.
So this begs the question, how exactly do you get positive email reputation when all your emails go into the spam folder on day zero?
Try setting up Microsofts Smart Network Data Services.
Deliverability to Outlook.com is based on your reputation. The Outlook.com Smart Network Data Services (SNDS) gives you the data you need to understand and improve your reputation at Outlook.com. But just looking at the data isn't enough! Maintaining a good reputation is a lot of work. You should use this data to keep your mailing lists clean and to monitor the IPs you control for unusual behavior. Reputation is always the responsibility of the sender. SNDS gives senders access to detailed data about individual IPs, and it also includes our Junk Email Reporting Program, which lets you receive reports when users junk your messages. Now you can view IP data and manage feedback loop settings from one convenient website.


