You need at least two IP addresses on your VPS. Bhost can set this up for a nominal monthly fee. To check what your IP addresses are use the Bhost control panel and click on the networking tab. I find it useful to keep this open in a different browser window as we will be using these a lot during this setup procedure.
To install Webmin see this article.(link here to my webmin intallation article)
Make sure Bind is installed. On Bhost I think is done by default
Creating a Zone with Webmin
In name server jargon a zone is similar to a domain name. For example, you have a zone for yourdomain.com. All sub-domains, for example www.yourdomain.com, ftp.yourdomain.com, etc, are all part of the yourdomain.com zone.
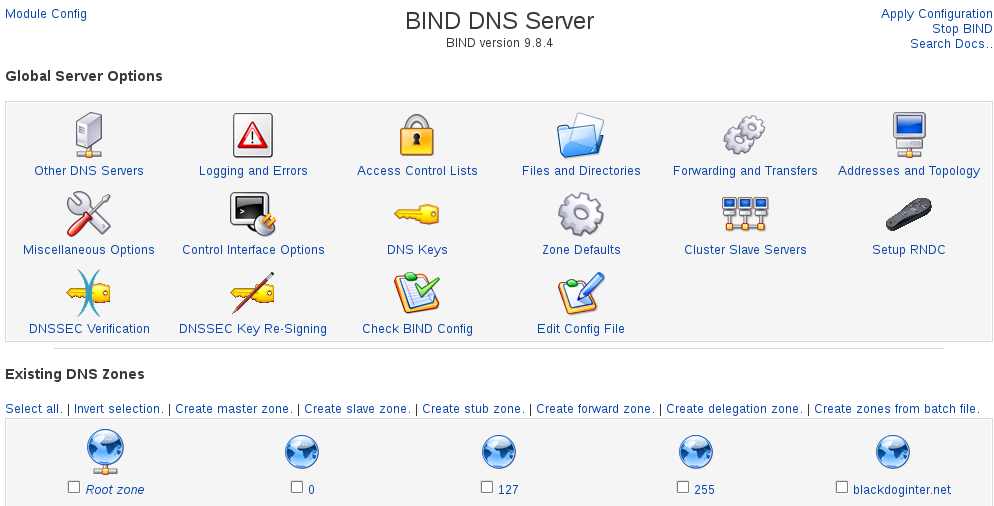
To setup a zone, go to your Webmin CP. Then Servers. Then Bind. If prompted to create a new named.conf file, choose the "Setup as an internet name server, but use Webmin's older root server information " option.
Did you get an error like
The primary configuration file for BIND /var/named/chroot/etc/named.conf does not exist, or is not valid. Create it?
. Then you need to update your webmin modules (via webmin).
Under Zone Defaults, consider setting the Time-to-Live setting to 30 minutes (the 'Refresh' value). That makes it a bit more convenient when you're setting things up. There is nothing so annoying as making a mistake in your set up, and then having your ISP cache that error for the next day.
A short TTL will direct your ISP to cache your DNS information for a shorter period. Causing it to consult your DNS server more frequently. If your setup is stable, leave the TTL setting at its default. That will lower the load placed on your server.
Leave the defaults for the other settings on this page.
Notes on Filling Out Webmin Fields
In the following examples if something is quoted, don't enter the quotes on the form. If there is a period inside the quotes, then it is significant and you need to enter that. It indicates the name is absolute.
Edit Zone Parameters
A 'zone' is basically a domain name (yourdomain.com). Domain names like www.yourdomain.com and mysql.yourdomain.com are in the 'yourdomain.com' zone.
To start your DNS setup, create a new Master Zone.
Domain name is your zone. e.g. "yourdomain.com". "Master Server" is the DNS server 'in charge' of DNS for the zone. Other DNS servers are 'slave' servers and will generally sync themselves up with the master server. Typically, you'd enter "ns1.yourdomain.com" for the "Master Server". Enter an email address. Perhaps set the "Default Time to Live" to a lower value. Webmins default generates this message in a DNS check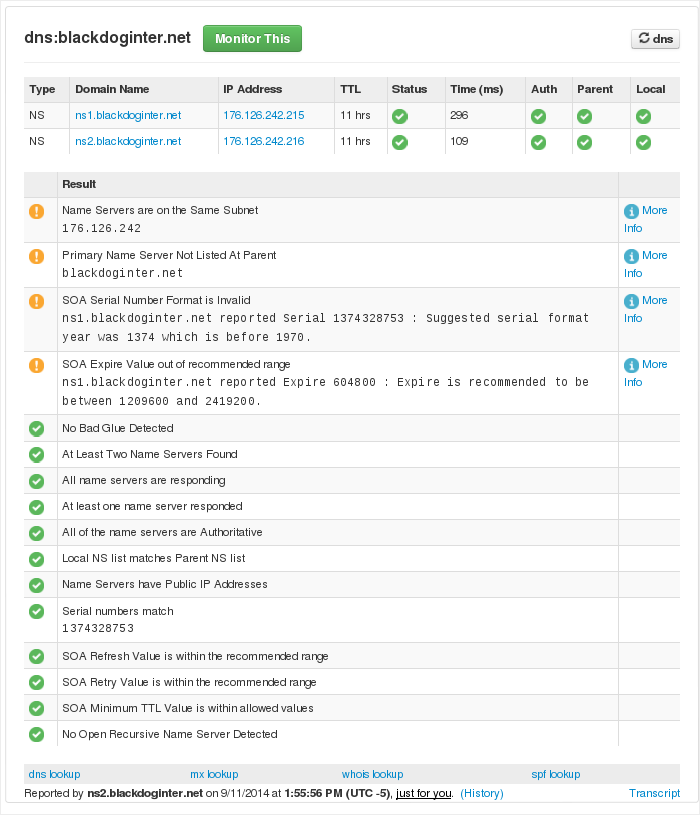
'A' Address Records
Create an 'A' record (this sets the IP address for a domain). E.g. Enter a 'Name' of "yourdomain.com." (include the trailing period, without the quotes). Set your IP Address.
'NS' Name Server Records
Create an 'NS' record this will be the Name Server for the domain. E.g. Enter a "Zone Name" of "yourdomain.com." (include the trailing period, without the quote). Set the "Name Server", for example to "ns1.yourdomain.com." Add another record for ns2.yourdomain.com. You will need to define ns1.yourdomain.com and ns2.yourdomain.com (via CNAME or 'A' Address records). It is important to ensure your domain registrar has the same details setup as you enter here. These are the 'glue' records that hold everything together.
'C' CName Records
Create a Name Alias ('CN' record). This creates a "Name" that resolves to a different domain. For example enter a "Name" of "www". Or "www.yourdomain.com.". Enter a "Real Name" like "yourdomain.com."
'MX' Mail Server Records
First, create a mail.yourdomain.com 'A' Address. Then create a Mail Server ('MX') record. Use a "Name" of "yourdomain.com.". Set the 'Mail Server' field to mail.yourdomain.com. Set a priority. 1 will do. If you have multiple mail servers, the mail server lowest priority that is available is used).
Note: Webmin may refuse to set up "yourdomain.com.". If so, try using "mail.yourdomain.com.".
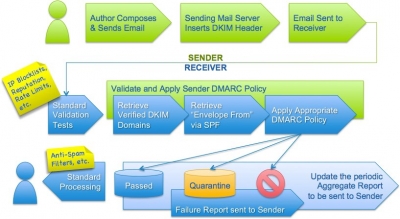
Correctly setting up a mail server with SPF (Sender Policy Framework) and DKIM (DomainKeys Identified Mail) are outwith the scope of this tutorial but need consideration if you don't want your important email to a client end up in their junk mailbox.
Go back to the Zone list. Hit Apply Changes.
Note: BIND (aka named) may not be running by default on your server. Make sure it starts on server startup, by logging into your server and running this command:
chkconfig --level 35 named on
Now, let's test your DNS setup. Use an online tool like http://mxtoolbox.com/DNSCheck.aspx. Or from your PC, run the nslookup command. Switch your server to your DNS server by typing "server yourserveripaddress". Increase the amount of detail you see by typing
set debug
. Do a lookup on the names you entered. "yourdomain.com", "www.yourdomain.com". Check they return the right information. To check you mail server in nslookup, type "set type=MX", followed by "yourdomain.com".