SSL allows sensitive information such as credit card numbers, social security numbers, and login credentials to be transmitted securely. Normally, data sent between browsers and web servers is sent in plain text—leaving you vulnerable to eavesdropping. If an attacker is able to intercept all data being sent between a browser and a web server they can see and use that information.
Setting up an SSL server is not that easy or cheap usually but there some alternatives.
This is a great free service but a pain to set up.
Personal Identification
You must first set up an account with them and get a browser certificate. This shows them you are who you say you are. At this point it's best to have your email client open ready to receive messages because the credentials thay send you are only valid for a short time.After you paste the verification code into their webform your browser certificate is install to your browser.

This procedure puts an SSL certificate on your browser so they know for certain who you are. You then apply for an SSL certificate for your domain name.
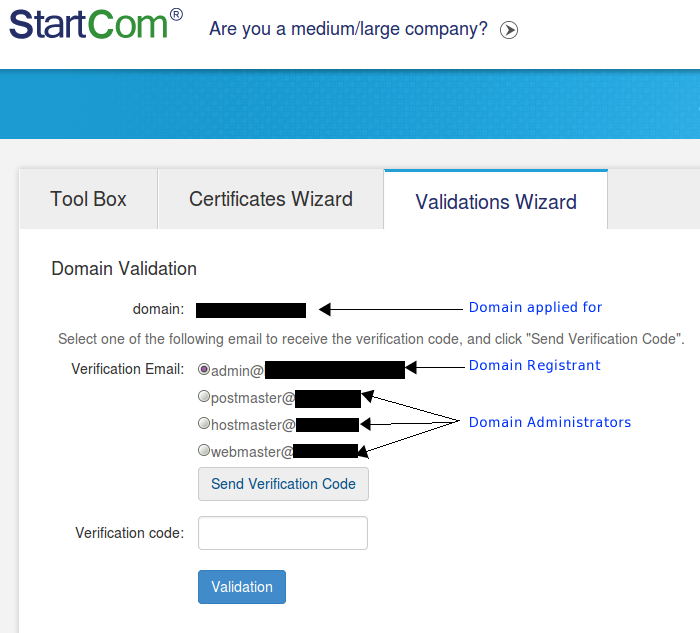
Proof of Domain Ownership
After setting up an account you have to prove that you own or have some authority to apply for a certificate on behalf of your website. StartSSL does this by sending an email to an administrative email account which MUST be authoritative i.e. the email you used when registering the domain, or, an administrative level email account on the domain you are applying for, a Gmail or Hotmail account will NOT work.
Apply for Server SSL Certificate
This process involves you generating a Certificate Signing Request on your domain. Since this varies according to the operating system software e.g. CentOS, Ubuntu or Debian, I am not going to cover this here. To generate a CSR, a key pair must be created for the server. These two items are a digital certificate key pair and cannot be separated. If the public/private key file or password is lost or changed before the SSL certificate is installed, the SSL certificate will need to be re-issued. The private key, CSR, and certificate must all match in order for the installation to be successful. There are many excellent tutorials already on the web, just Google your OS and "generate CSR" to find one that suits you. I recommend RapidSSL tutorials even though I do not use their services
Once generated you have to submit this CSR to StartSSL who will begin the process of issuing you your certificate to download. I strongly recommend you do NOT password protect these certificates since this cause Apache to request the password each time it starts. If your server tries to restart itself whilst you are not logged in through a terminal it will fail causing your website to go offline.
At the end of this process you will have a zip file to download. Keep this file safe and secure for the full year your certificate is valid.
Install Certifcates on Server
Unzip the downloaded file locally then upload the enclosed files to your servers default SSL locations (on Debian /etc/ssl). The private key you created during CSR generation will already be there in directory like /etc/ssl/private/.
Now your need to configure Apache to you all the keys. The default SSL configuration file will look something like this
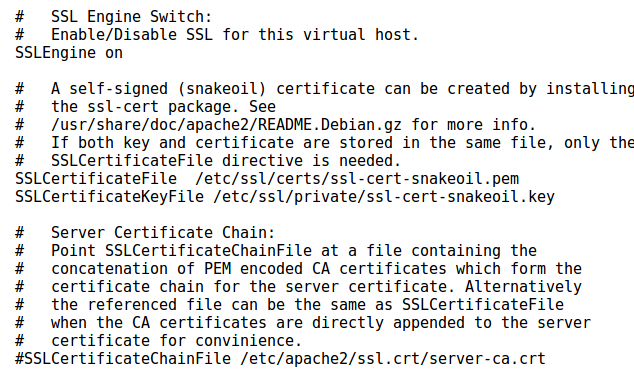
Three lines need to be edited
SSLCertificateFile   /etc/ssl/certs/domain.crt(it is from the apache.zip)
SSLCertificateKeyFile  /etc/ssl/private/private.key
SSLCertificateChainFile    /etc/ssl/certs/1_root_bundle.crt(it is from the apache.zip)
Save the configuration file then restart Apache. You can then check your server SSL configuration by using excellent free tool at https://www.ssllabs.com/ssltest/.
Summary
- Service is free. Revocation is not.
- Certificate is valid for 12 months.
- As complicated to set up as paid services
Let’s Encrypt is a free, automated, and open certificate authority (CA), run for the public’s benefit. Let’s Encrypt is a service provided by the Internet Security Research Group (ISRG).
The key principles behind Let’s Encrypt are:
-
Free: Anyone who owns a domain name can use Let’s Encrypt to obtain a trusted certificate at zero cost.
-
Automatic: Software running on a web server can interact with Let’s Encrypt to painlessly obtain a certificate, securely configure it for use, and automatically take care of renewal.
-
Secure: Let’s Encrypt will serve as a platform for advancing TLS security best practices, both on the CA side and by helping site operators properly secure their servers.
-
Transparent: All certificates issued or revoked will be publicly recorded and available for anyone to inspect.
-
Open: The automatic issuance and renewal protocol will be published as an open standard that others can adopt.
-
Cooperative: Much like the underlying Internet protocols themselves, Let’s Encrypt is a joint effort to benefit the community, beyond the control of any one organization.
- From https://letsencrypt.org/about/
Installing Let’s Encrypt
Note: Let’s Encrypt is in beta. Please don’t use it unless you’re comfortable with beta software that may contain bugs.
If your operating system includes a packaged copy of letsencrypt, install it from there and use the letsencrypt command. Otherwise, you can use our letsencrypt-auto wrapper script to get a copy quickly:
$ git clone https://github.com/letsencrypt/letsencrypt
$ cd letsencrypt
$ ./letsencrypt-auto --help
letsencrypt-auto accepts the same flags as letsencrypt; it installs all of its own dependencies and updates the client code automatically (but it’s comparatively slow and large in order to achieve that).
How To Use The Client
The Let’s Encrypt client supports a number of different “plugins” that can be used to obtain and/or install certificates. A few examples of the options are included below:
If you’re running Apache on a recent Debian-based OS, you can try the Apache plugin, which automates both obtaining and installing certs:
./letsencrypt-auto --apache
Note: If you are hosting several different websites on the same server, using virtual hosts, this will issue only one certificate but configure all websites to use the same certificate.
On other platforms automatic installation is not yet available, so you will have to use the certonly command. Here are some examples:
To obtain a cert using a “standalone” webserver (you may need to temporarily stop your exising webserver) for example.com and www.example.com:
./letsencrypt-auto certonly --standalone -d example.com -d www.example.com
Congfigure Apache
Edit three lines in the Appache SSL configuation file to point to the certificaes provided by Lets Encrypt
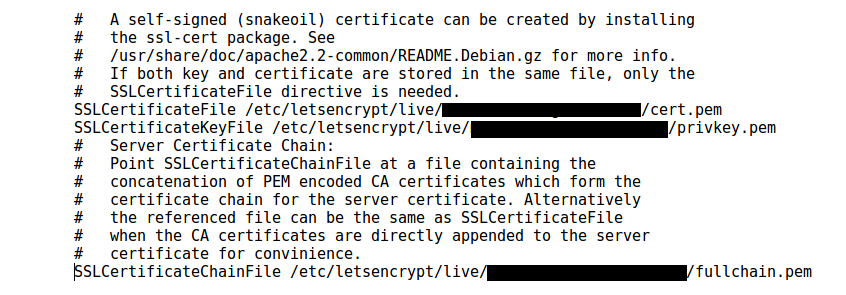
where the redacted blocks are your domain. Save the configuration file then restart Apache.
Summary
- Service is free. Revocation is free.
- Certificate is valid for 90 days.
- Simple to set up.
Hint:
One of the checks performed by the SSL site test linked above to see if your server supports Strict Transport Security (HSTS). To enable this on you site you need to enable mod_headers then edit the Apache SSL configuration file to include the following code directly after you enable SSL as per
SSLEngine on
# HSTS (mod_headers is required) (15768000 seconds = 6 months)
Header always set Strict-Transport-Security "max-age=15768000"
SSLCipherSuite ECDHE-RSA-AES128-GCM-SHA256:ECDHE-ECDSA-AES128-GCM-SHA256:ECDHE-RSA-AES256-GCM-SHA384:ECDHE-ECDSA-AES256-GCM-SHA384:DHE-RSA-AES128-GCM-SHA256:DHE-DSS-AES128-GCM-SHA256:kEDH+AESGCM:ECDHE-RSA-AES128-SHA256:ECDHE-ECDSA-AES128-SHA256:ECDHE-RSA-AES128-SHA:ECDHE-ECDSA-AES128-SHA:ECDHE-RSA-AES256-SHA384:ECDHE-ECDSA-AES256-SHA384:ECDHE-RSA-AES256-SHA:ECDHE-ECDSA-AES256-SHA:DHE-RSA-AES128-SHA256:DHE-RSA-AES128-SHA:DHE-DSS-AES128-SHA256:DHE-RSA-AES256-SHA256:DHE-DSS-AES256-SHA:DHE-RSA-AES256-SHA:ECDHE-RSA-DES-CBC3-SHA:ECDHE-ECDSA-DES-CBC3-SHA:AES128-GCM-SHA256:AES256-GCM-SHA384:AES128-SHA256:AES256-SHA256:AES128-SHA:AES256-SHA:AES:CAMELLIA:DES-CBC3-SHA:!aNULL:!eNULL:!EXPORT:!DES:!RC4:!MD5:!PSK:!aECDH:!EDH-DSS-DES-CBC3-SHA:!EDH-RSA-DES-CBC3-SHA:!KRB5-DES-CBC3-SHA
SSLHonorCipherOrder on